- Account Locked
Cannot change password for 24 hours?Exceeded max number of login attempts? Unlock Account
- Requires 7-digit MCC ID
- Instructions will be sent to non-MCC email
- Change Password
Routine password change? Update Password
- Requires 7-digit MCC ID & current password
- Forgot MCC ID
- Requires last name &
- Social Security number (SSN) or 7-digit MCC ID
- Forgot MCC Username
- Requires first & last name
- Email address (MCC or non-MCC email address)
- If account is identified, information will be sent to email entered
- Forgot Password
- Requires 7-digit MCC ID
- Instructions will be sent to non-MCC email
To reset your password for MCC Systems (WebAdvisor, Self-Service, Brightspace, email, computer logins, and campus WiFi), follow this process:
- Select the 'Reset Password' link above
- Once you submit the password reset request, completely close your browser (all tabs & all windows)
- Mac - close the web browser, right click on the program icon (located on the Menu Bar) and select Quit to close the program
- Mobile Device - close out of the web browser by showing running applications and then swipe away/close the browser app. If you are unsure on how to close running applications on your device, you may also restart your smartphone to complete the process.
- Check your personal email for an MCC password reset email - it will include a link to reset your password
- Click the link, in the email, to reset the password - then click the 'Change My Password' button
- Read the requirements for a new password - enter your desired password, confirm the password by entering again, then click 'Change Password'
- Once you confirm it has changed (you will see your McLennan Community College email in green letters), close the browser again (All tabs & windows) to complete the password change process
- Mac - close the web browser, right click on the program icon (located on the Menu Bar) and select Quit to close the program
- Mobile Device - close out of the web browser by showing running applications and then swipe away/close the browser app. If you are unsure on how to close running applications on your device, you may also restart your smartphone to complete the process.
- Password Change Button Not Working
Your account is locked. You must unlock your account before trying to reset your password.
- Under 'Account Locked', select the 'Unlock Account' link
- Once you submit the Account Unlock request, completely close your browser (All tabs & all windows)
- Mac - close the web browser, right click on the program icon (located on the Menu Bar) and select Quit to close the program
- Mobile Device - close out of the web browser by showing running applications and then swipe away/close the browser app. If you are unsure on how to close running applications on your device, you may also restart your smartphone to complete the process.
- Check your personal email for an MCC password reset email - it will include a link to unlock your account.
- Click the link, in the email, and a new page will open
- Click the 'Unlock my Account' button
- On the 'Account Unlock Report' page, close your web browser again to complete the unlock process.
- Mac - close the web browser, right click on the program icon (located on the Menu Bar) and select Quit to close the program
- Mobile Device - close out of the web browser by showing running applications and then swipe away/close the browser app. If you are unsure on how to close running applications on your device, you may also restart your smartphone to complete the process.
- Reset your password again by following the steps under 'Reset Password' *Note - do not reuse any old links, or you will receive an error.
- Once your password is reset, and you following the instructions to close/reopen your browser - try to login again
IT Resources & Services
Please find available IT Resources and Services, based on your current status:
- Current Students, Faculty & Staff
- Faculty & Staff
- Former Students/Faculty/Staff, Guests & Non-Students
- Students Only
Current Students, Faculty & Staff
- Account & Password: Current Students, Faculty & Staff
- Brightspace
- Brightspace Access
-
Go to: Brightspace Login
-
Login with your MCC username (first name initial, last name and seven digit MCC ID - example: jd1234567) and password
-
- Brightspace Support 24/7
Chat Support (within Brightspace)aka Get Help (blue button, lower, right side of screen)
- Brightspace Tutorials (via YouTube)
Below are some popular tutorials sorted by Instructor or Learner. For a full list of tutorials, see the Brightspace Tutorials YouTube channel.Instructor
- Announcements | Overview | Instructor
- Assignment | Create | Instructor
- Classlist | Overview | Instructor
- Content | Copy Existing Into Course | Instructor
- Content | Create | Instructor
- Course | Set Up | Instructor
- Discussion |Create Forum | Instructor
- Discussion | Create Topic | Instructor
- Grades | Understanding | Instructor
- Navigate | Brightspace | Instructor
- Quiz | Create | Instructor
Learner
- Announcements | Overview | Instructor
- Course Not Showing
Course Access
Courses for upcoming semesters may not be available until 3 days before the applicable semester is scheduled to begin.
Course Changes
Course changes (late registration, registration on the 1st day of class, late enrollment and course add/change/drop) may take up to 24 business hours to update/show in Brightspace.
- Invalid Username/Password Message
New Student Access
Access to Brightspace may be delayed up to 24 business hours, after course registration, resulting in an invalid username/password message until the new account is created.
Returning Student Access
If you are a returning student, or have waited 24 business hours, and still cannot login, please reset your password using the instructions located in the Account & Password: Current Students, Faculty & Staff section. Then try to login again.
- LockDown (Respondus) Browser Not Working
- Uninstall the Respondus LockDown browser
- Enable pop-ups. *See enable pop-ups instructions below
- clear your web browser's cache/cookies. *See clear cookies/cache instructions below.
- Reinstall the LockDown browser using the link provided in Brightspace.
Enable Pop-Ups (Chrome) Instructions
- Select the 3 dots (top, right side of the screen) and click 'Settings'
- Select 'Privacy and Security'
- Select 'Site Settings'
- Select 'Pop-ups and Redirects' and under 'Default Behavior' allow sites to send pop-ups and redirects.*
- *Note: After your quiz is complete, you can disable pop-ups and redirects if you would prefer for them not to be enabled.
Clear Cookies/Cache Instructions
Be Advised! Before clearing your browser's cache/cookies - this process will sign you out of websites and will erase any unsaved data.
- Press Control+Shift+Delete in your web browser (Chrome, Firefox, Edge) to access the 'Clear Browsing Data' menu.
- In the menu, make sure Cookies/Cached data are checked - set the time range to 'All Time', then click the 'Clear Data' button.
- After, close all tabs and windows of the browser - Alt+F4 will also close each window.
- For Mobile Device or Chromebook:
- Restart your entire device after clearing your cookies and cached data.
- Brightspace Access
- Colleague
-
Colleague UIWeb(faculty & staff ONLY)
- Request System Access (via SharePoint)(faculty & staff ONLY)
-
- Computer System Recommendations
Table with computer system recommendations REQUIREMENT
RECOMMENDATION
COMMENTS
Operating System (OS)* Windows 10/Windows 11 or macOS These systems offer excellent performance and compatibility with a wide range of MCC services. RAM 8 GB (Gigabyte) or more 8 GB RAM is the minimum recommendation. More RAM will further improve overall system performance. Storage MEGABYTES or more MEGABYTES is the minimum recommendation to accommodate the OS, applications, and user data. *Please Note: Chromebook/ChromeOS is not recommended to access all MCC services.
While ChromeOS is a lightweight and fast operating system, it lacks the extensive software compatibility (such as with Office 365) offered by Windows and macOS.
- Document Management (Softdocs Etrieve)
Document Management Solution
Softdocs Etrieve is a fully browser-based Document Management Solution that allows you to store and organize documents in a single content repository.
Softdocs Content can seamlessly integrate with Colleague, maintaining student and employee data consistency while providing more efficient business processes. Softdocs allows you to store documents, classify as specific document types, apply values to keywords in order to file those documents and to quickly search for them to retrieve later.
How do I setup Document Management? Create Help Desk Ticket
Forms Solution
Softdocs Etrieve is also an online Forms platform which allows students/faculty/staff to fill out, review, comment, approve, deny, and route forms as needed.
Processing time is reduced as forms are routed through a pre-set and automated workflow via Etrieve Flow.
- Which form is right for me?
MCC has a couple of options for forms. Review the table below to determine which form best meets your needs.
Table to decide which form to use: Acrobat Sign vs Softdocs ITEMS TO CONSIDER ACROBAT SIGN SOFTDOCS When to use Contracts and agreements requiring validated signatures Official college forms for business processes involving: requests, acknowledgements, and approval Level of setup needed Medium High Integrated with Colleague No Yes Target Audience College signatories and non-college account holders (parents, vendors, etc.) Students, Faculty, Staff Workflow Yes Yes How do I setup a form? Create Help Desk Ticket Create Help Desk Ticket Where can I learn more? Acrobat Sign Website Softdocs Website - Softdocs Etrieve Access
-
Go to: Softdocs Etrieve Login
- You will be prompted to login through the MCC SSO (single sign-on) screen.
-
Students:login with your MCC username (first name initial + last name initial + 7-digit MCC ID, example: js1234567) and password
-
Faculty/Staff: login with your MCC username (first name initial + last name, example: jsmith) and password
-
-
- Softdocs Etrieve Support Resources
The Softdocs Etrieve Community is available for individuals with access to Configure or Administer (ability to create forms) content.
The Community link will appear, once logged into Etrieve, in the drop-down menu next to your profile name (top-right hand corner).
-
Go to: Community Login
-
- Softdocs Etrieve Video Demos
To learn more about Softdocs Etrieve, click any of the links below to see a short demo video.
- Which form is right for me?
- Microsoft Office 365
Students and educators can sign up for Office 365 Education for FREE (includes: Word, Excel, PowerPoint, etc.). Use your valid MCC email address to get started today.
*Please Note: Access to this FREE account is only available to current MCC students/faculty/staff.
Download for Free
Register with MCC Email
-
@mclennan.edu or
-
@students.mclennan.edu
Install Apps
-
Go to Microsoft 365, login with your MCC Email and Microsoft password, and install the apps
-
Supported Device: Windows or macOS
- Chromebook/ChromeOS is not compatible and does not support the desktop/mobile apps.
-
- Microsoft Support Resources
- WebAdvisor
- WebAdvisor Access
Turn off pop-up blockers before logging into WebAdvisor
-
Go to: WebAdvisor Login
-
Login with your MCC username (first name initial, last name initial and seven-digit MCC ID - example: jd1234567) and password
Account Activation
Must be FULLY admitted, as a student, by the Admissions Office
Account activated within 24 hours
Log Out of WebAdvisor to Close
Finished with session? Select LOG OUT (top right hand corner of screen) to close
Helps avoid reaching the max number of cookies error/need to clear cache
-
- WebAdvisor Support Resources
-
Reached max number of cookies? Need to Clear Cache? How to Clear Cache
- WebAdvisor Access
- Zoom
- McLennan Zoom Access
-
Go to: McLennan Zoom Login
-
Sign in with MCC username and password
-
Select Hostor Join A Meeting
-
Select With Video Offor With Video On
-
Prompt appears "This site is trying to open Zoom Meetings", select Open
-
Will see the Meeting Room
-
Select End Meetingwhen finished
-
- Other Ways to Access Zoom
-
Desktop App
-
Click on the Start Zoomicon from your computer/laptop
-
Select Sign In
-
Select Sign In with SSO
-
Type " mclennan" in the Company Domain, select Continue
-
Login with MCC user name and password, and select the checkbox next to Remember Me
-
-
Mobile App
-
Download the ZOOM Cloud Meetings App
-
Open the App
-
Select SSOto Sign In
-
Type " mclennan" in the Company Domain, select Continue
-
Login with MCC user name and password, and select the checkbox next to Remember Me
-
-
- Zoom Support Resources
- McLennan Zoom Access
Faculty & Staff
- Adobe Creative Cloud
Download for Free, up to 2 devices
- Adobe Document Cloud
- Camtasia
Camtasia makes it simple to record and create professional-looking videos on Windows and Mac.
Download for Free, up to 2 devices
Need Camtasia support?
- Classroom Technology
Classroom technology options at McLennan Community College (MCC) are listed below.
Smart Classroom Instructions are located in each classroom, attached to the podium.
How to Use the Technology
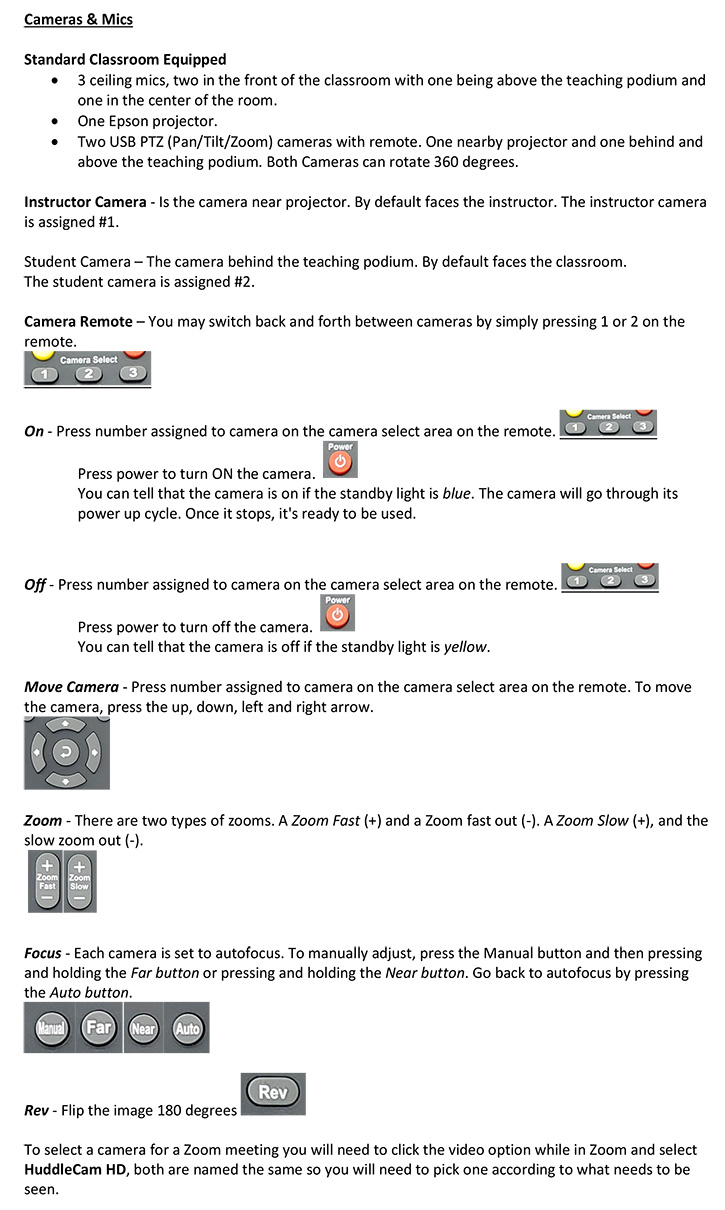
- How do I use the Cameras and Mics in the classroom?
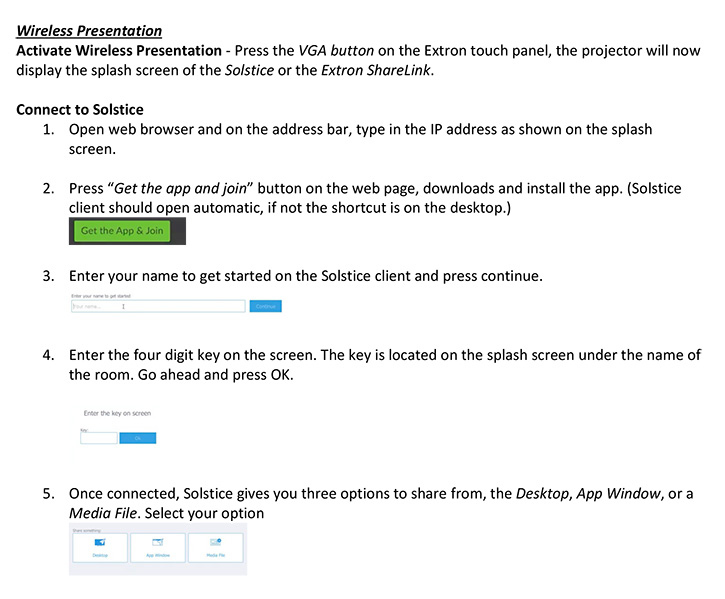
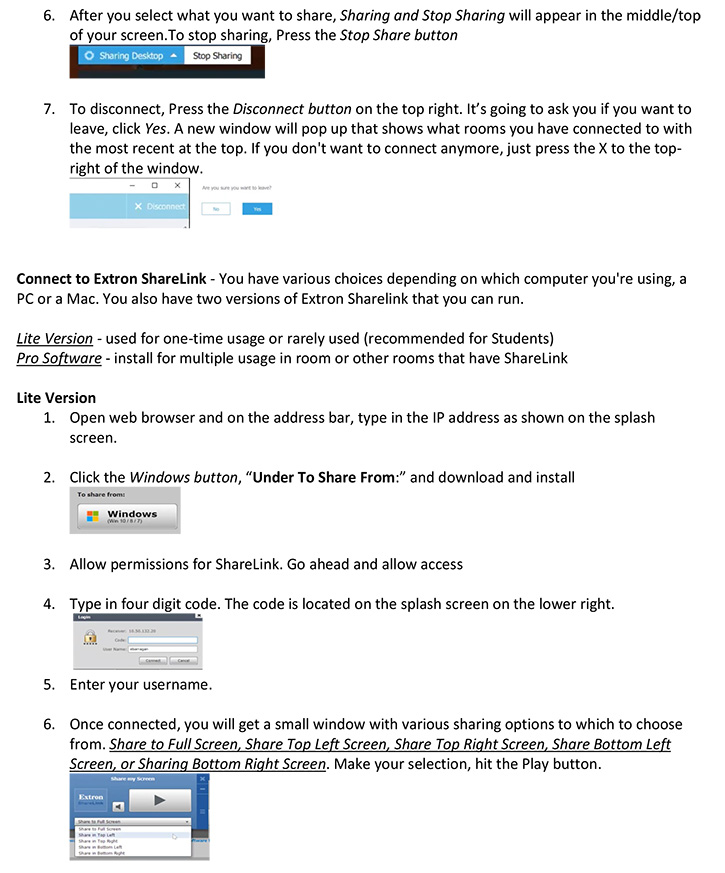
- How do I use Wireless Presentation?
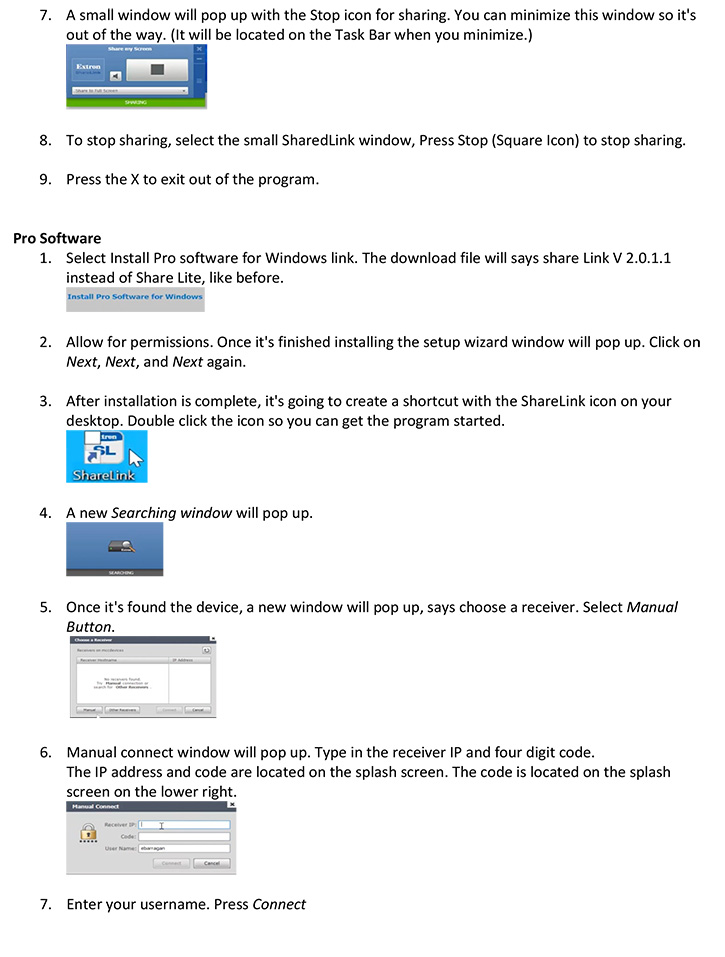

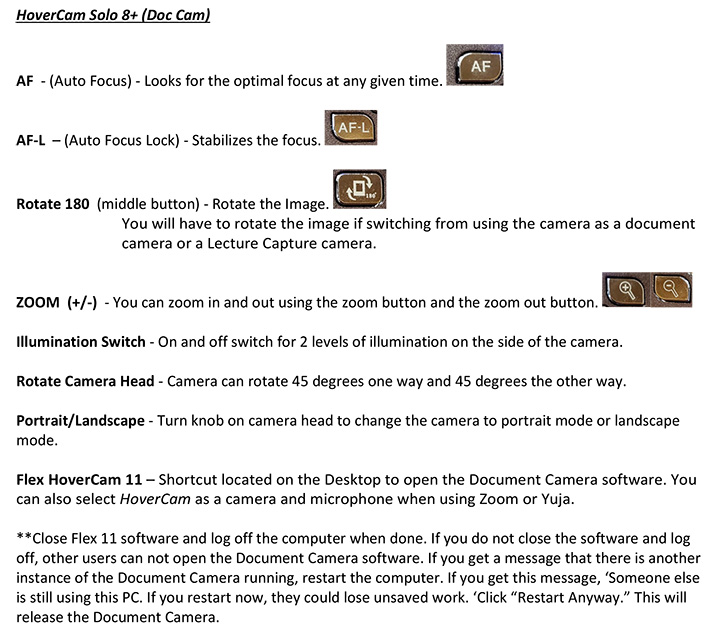
- How do I use the Document Cam?
- How do I use the Touch Monitor?
Touch Monitor
Monitor - Touch screen where you may use your finger or a stylus pen to write or select. You may adjust the monitor up, down, or tilt to write at a more comfortable position.
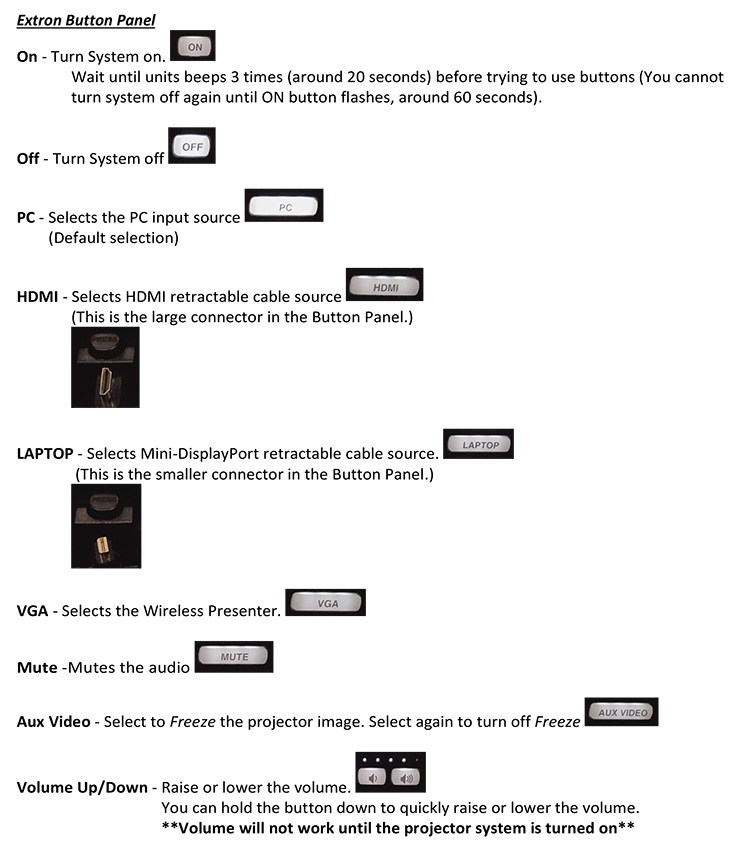
- How do I use the Touch Panel?
Troubleshooting
- How do I use the Cameras and Mics in the classroom?
- Conference Center Technology
Conference Center Control Screen options at McLennan Community College (MCC) are listed below.
Conference Center Control Screen Options
- Room Mode Screen
Use the Room Mode screen to setup the room layout.
Room Setup
There are 6 individual rooms that can be combined into multiple arrangements (image 1) - the most common setup is one unitized room (image 2).
Image 1
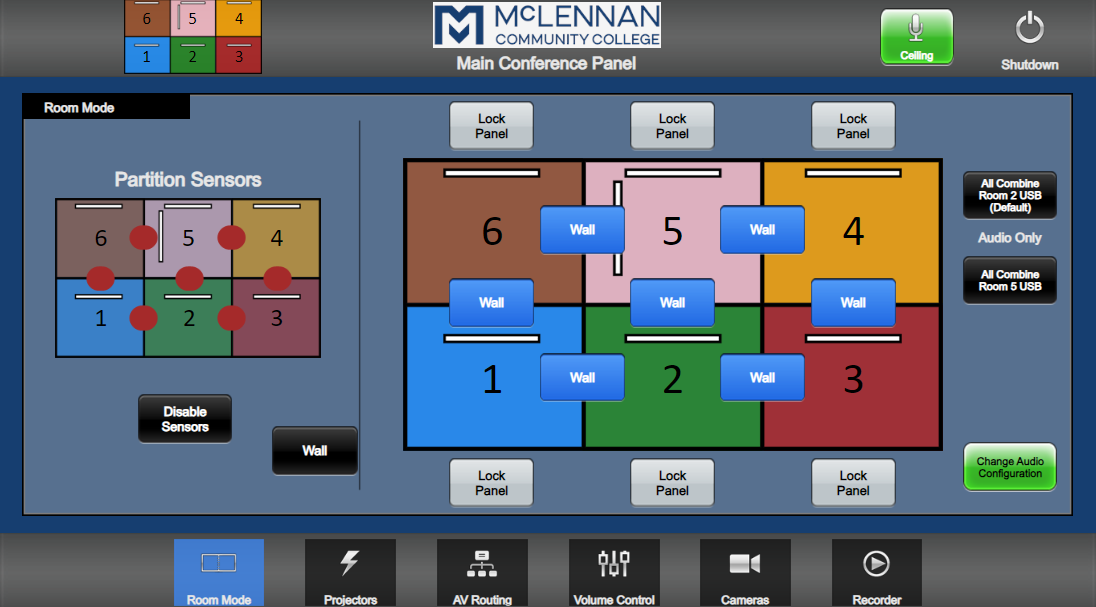
Image 2
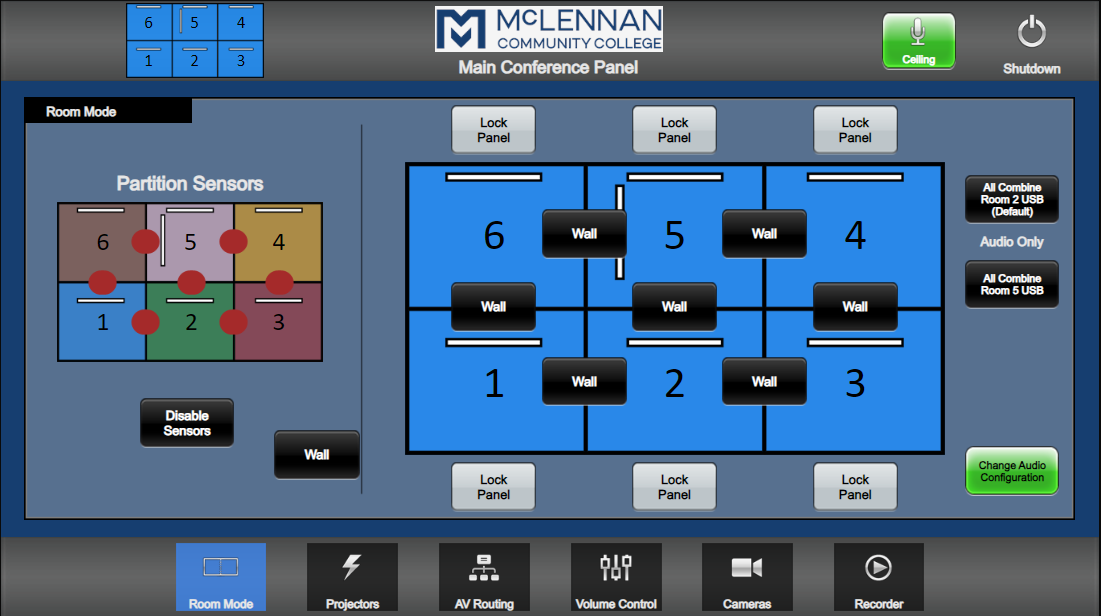
Each room is equipped with 1 wireless hand-held mic and 1 lapel mic with a belt transmitter. All mics are color coded to match the color of the room for easy identification (e.g. blue mic goes wish the blue room (room 1) on Room Mode (image 1).
Combining Rooms
When in Room Mode, on the left side of the screen, the current wall/partition layout is visible.
When a wall/partition is up, the sensors will automatically detect and adjust the room layout on the screen accordingly.
- Green Dot - the sensor detects a wall/partition
- Red Dot - wall/partition has NOT been detected, by the sensor
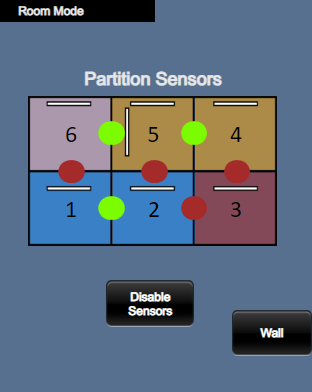
Press the Disable Sensor button, to disable the sensors at once.
Manually Override the Room Layout
Press the Wall button, between rooms, on the screen to manually override:
- Black Wall Button - a wall/partition is NOT setup (image 4)
- Blue Wall Button - a wall/partition is setup(image 5)
Image 4

Image 5

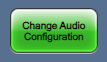
Apply Audio Room Layout
Once the room layout is complete, the rooms with the same color will work together as one room (see image 3 - rooms 1-2, both blue).To apply the audio room layout, press the Change Audio Configuration button.
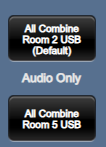
If the rooms are combined to be one big room, and all audio and video (A/V) is coming from:
- Room 5 - press the All Combine Rooms 5 USB
- Room 2 - press the All Combine Rooms 2 USB button
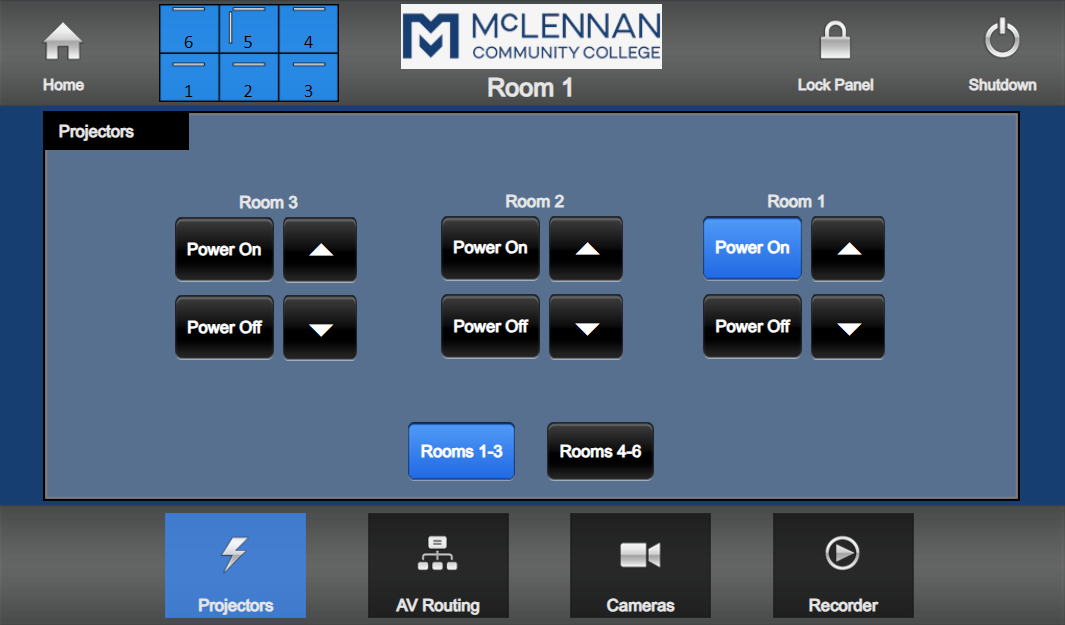
- Projector Screen
Use the Projector Screen to control the projectors (turn on/off) and projector screens (bring up/down).
- Power On - turns On projector for specific room.
- Power Off - turns Off projector for specific room.
- Up and Down Arrows - raises and lowers projector screen for specific room.
- Lamp Usage - shows how many hours of usage each projector has available.
Note: Room 5 is the only room with 2 screens, a front and side.

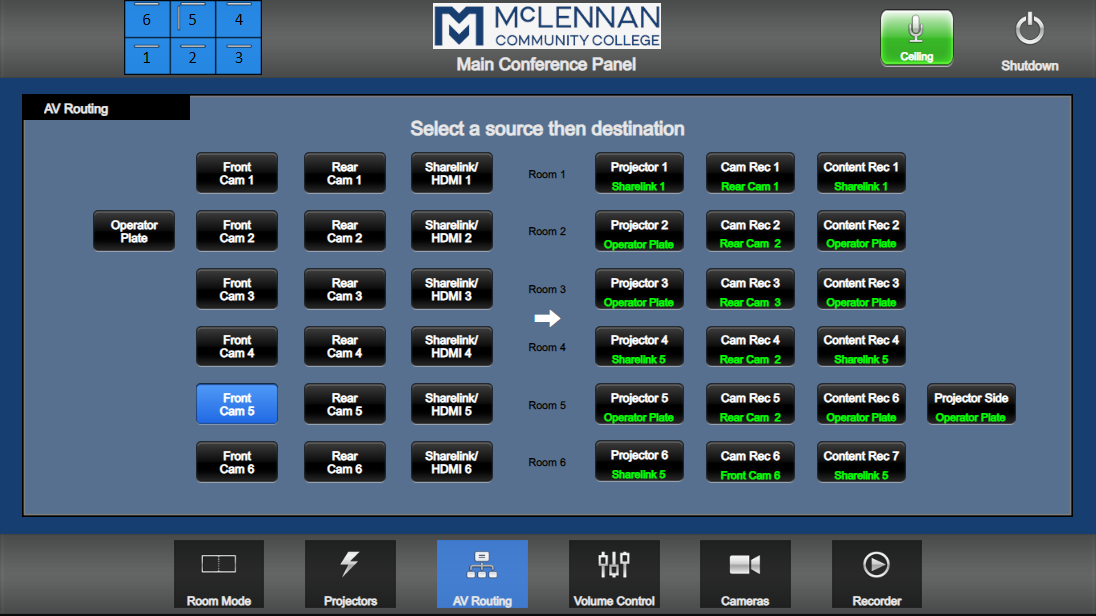
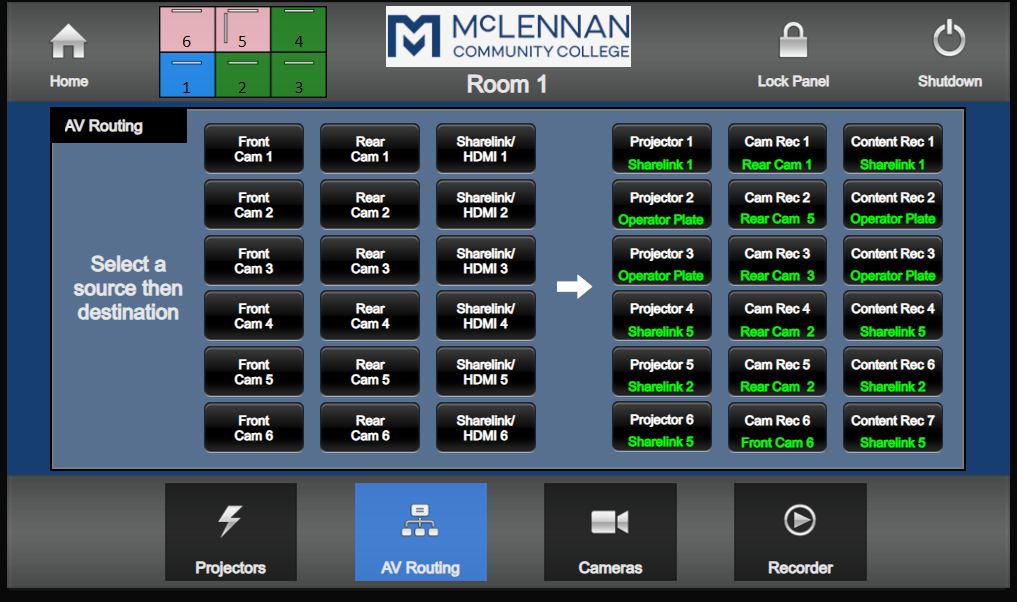
- Audio/Video (AV) Routing Screen
Use the AV Routing Screen to designate the source of the audio and video to display.
AV Setup
Rooms 1-6 each have 3 different AV Sources and Destinations, labeled with their assigned number.
Note: Room 2 has a 4th source, Operator Plate.
To designate which room receives AV input:
- Select a source
- Then, select the destination
Source Options
- Front Cam - video signal from Front camera in room
- Rear Cam - video signal from Rear camera in room
Destination Options
- Projector - projector in room
- Cam Rec - USB input in room
- Content Rec - recorder designated for room
Examples of AV Setup
After selecting the source and destination, the destination button will update with the sources input name.
Example 1 - Send the HDMI signal to the projector in Room 5:
- Select Sharelink/HDMI2
- Then select, Projector 5
- Under Projector 5, Sharelink 2 will appear
Note: The same source input that goes to Projector 5 will automatically display on the Projector Side, unless manually changed.
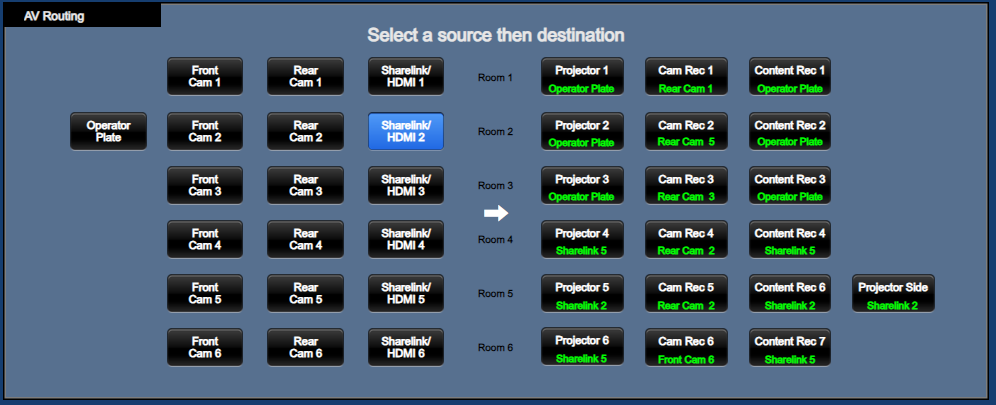
Example 2 - Send Rear Cam 2 signal to Cam Rec 5 for USB display:
- Select Rear Cam 2
- Then select, Cam Rec 5
- Rear Cam 2 will appear on Cam Rec 5
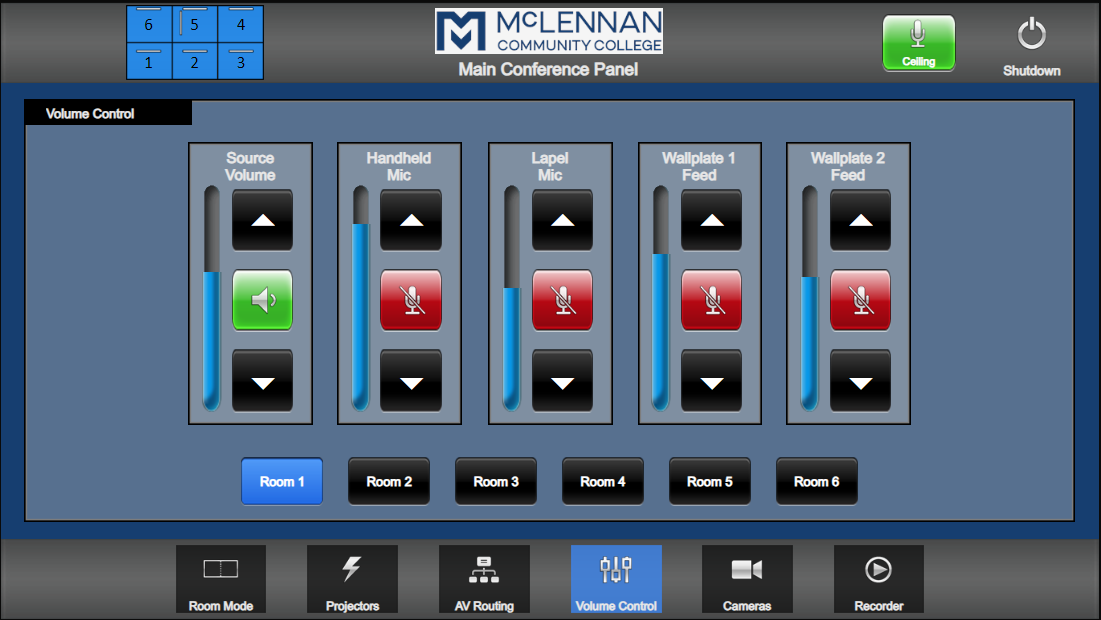
- Volume Control Screen
Use the Volume Control Screen to control audio device input linked to specific rooms.
Audio Input Sources
Rooms 1-6 have five different Audio input sources:
- Source Volume - volume level control for Sharelink/HDMI input
- Handheld Mic - volume level control for assigned wireless Handheld mic
- Lapel Mic - volume level control for assigned wireless Lapel mic
- Wallplate 1 Feed - volume control for assigned room TOP XLR input
- Wallplate 2 Feed - volume level control for assigned room Bottom XLR input
Press the Mic button to turn on a specific audio source:
- Green is On
- Red is Off
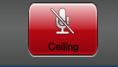
Ceiling Mic
Each room comes equipped with an overhead ceiling mic that can be activated when using programs such as: Zoom or other online web-conference programs.
Note: The ceiling mics all work together. There is No option to turn off individual ceiling mics. They are All On or All Off.
Press the Ceiling Mic button to turn the mics On/Off:
- Green is On (image 12)
- Red is Off (image 13)
Image 12
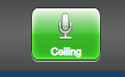
Image 13
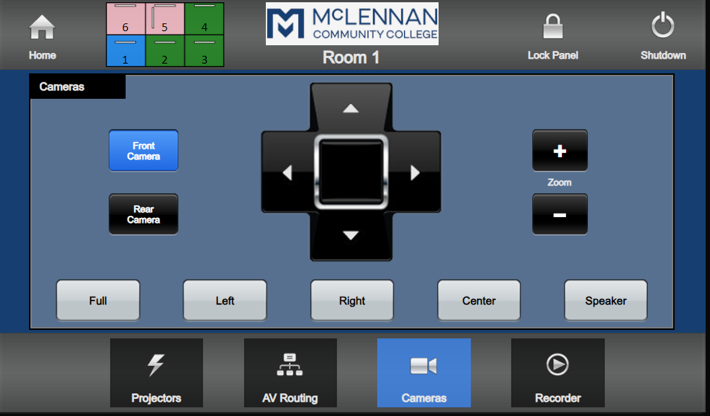
- Camera Screen
Use the Camera Screen to control both the Front and Rear cameras, in a specific room
Camera Setup
Each room is equipped with 2 cameras, Front/Rear facing. All cameras have Pan/Tilt/Zoom (PTZ) functions and camera presets.
Use the assigned buttons to select the desired camera:
- Blue Button - active/selected
- Black Button - non-active/non-selected
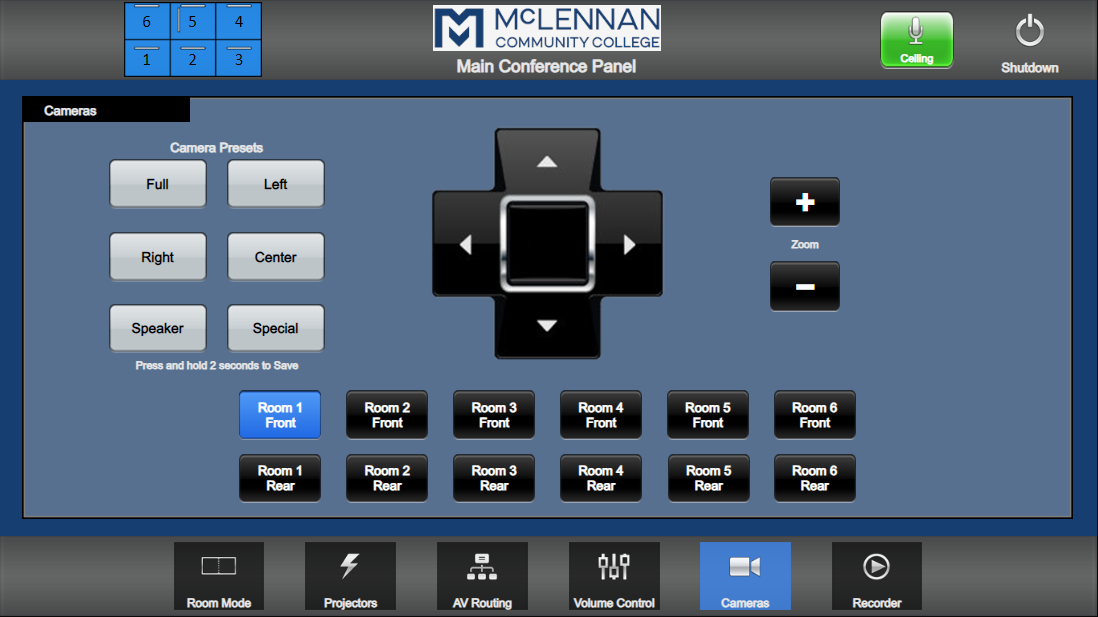
PTZ Functions
- Zoom + zooms in
- Zoom - zooms out
- Up/Down/Left/Right buttons - pan and tile the camera view
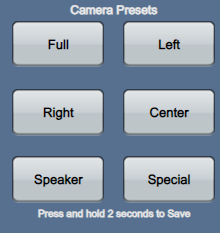
Camera Presets
- Full - full view of room
- Left - left view of room
- Right - right view of room
- Center - center view of room
- Speaker - view of speaker at podium
- Special - special view (can be anything)
Note: To reconfigure or make new presets, press and hold the desired button for 2 seconds to Save.
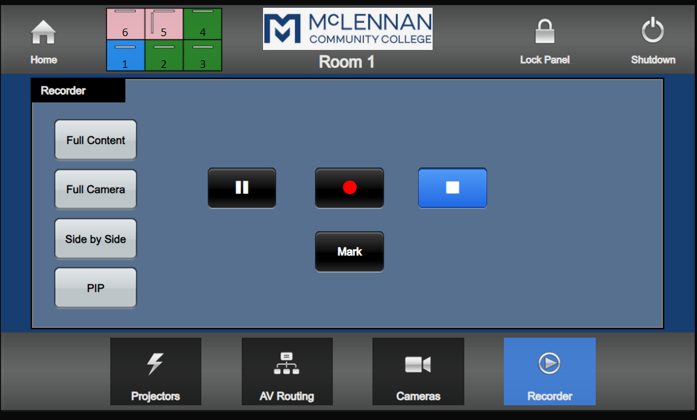
- Recorder Screen
Use the Recorder Screen to control recording for cameras.
Record for Video Streaming
Select the Camera/Source feed in the AV Routing Screen. Then, select the Room, 1-6, on the Recorder Screen.
- Red Circle - Record
- White Square - Stop
- Double White Lines - Pause
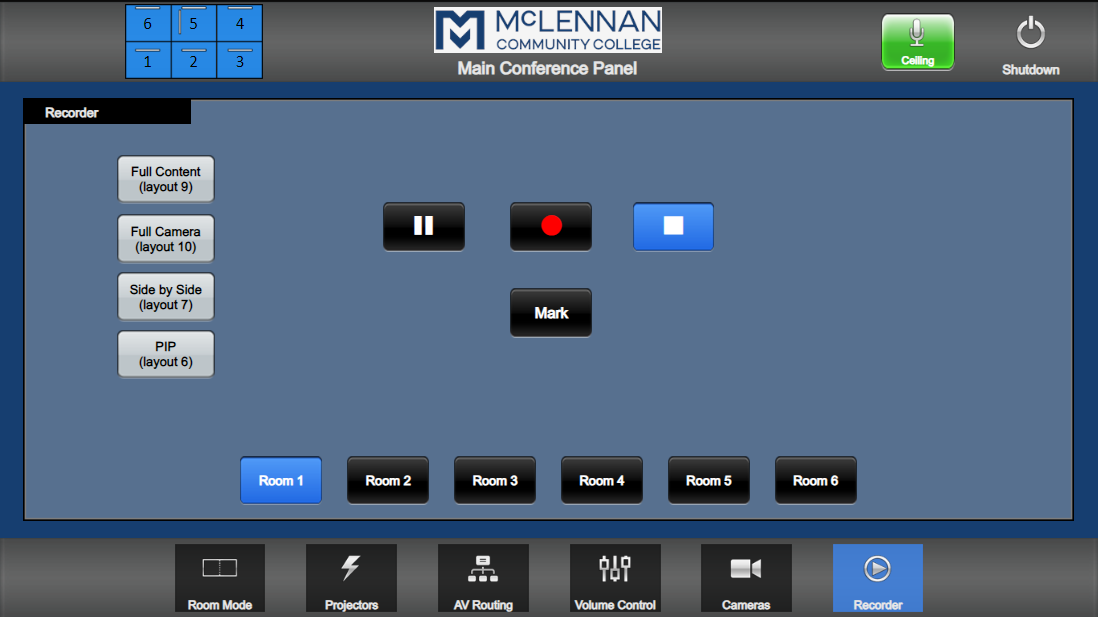
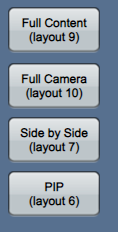
Change Recording Layout
- Full Content - source is the only item recording
- Full Camera - camera is the only item recording
- Side by Side - source and camera view are side by side on recording
- PIP - source takes up 90% of screen; camera takes up 10% of screen on recording
- Wall Mount Control Screen
Use the Wall Mount Control screen to control the specific room (1-6) you need.
Wall Mount Control Setup
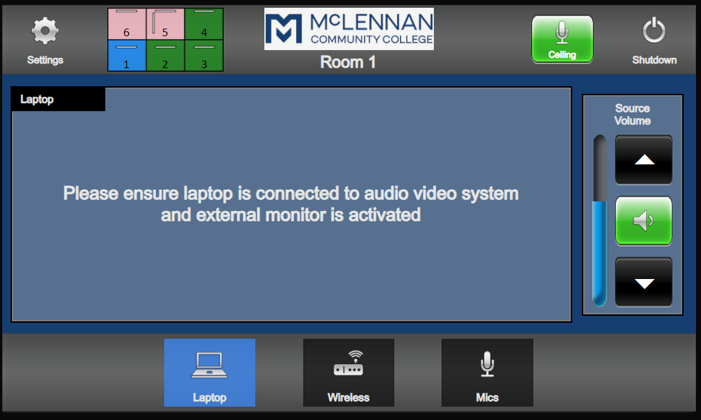
Each room has a wall mount control to control a specific room. The main screen shows the option for video and audio sources:
- Laptop - HDMI cable is plugged into laptop
- Wireless - signed in to use Sharelink
- Mics - mutes mic audio
- Source Volume - controls HDMI/Sharelink audio
- Ceiling - turns ceiling mic On/Off
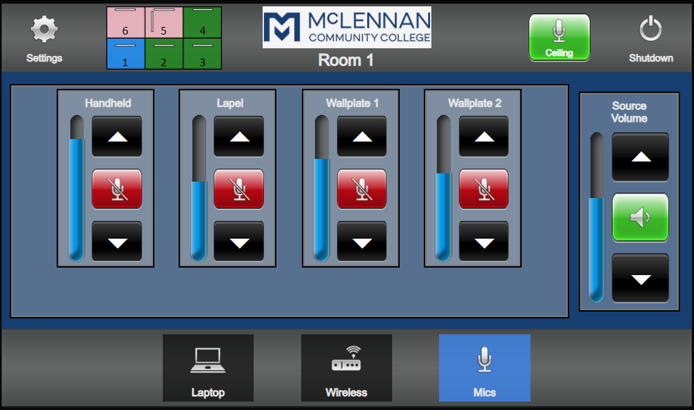
Mic Control
When the Mic Control is selected, additional audio sources may be available, based on the room selected. Room 1 options below:
- Handheld Mic
- Lapel
- Wallplate 1
- Wallplate 2
Access Other Control Screens
If you hold the Settings button for 5 seconds, it accesses the other control screens, which are used in the same manner.
Projector Screen - Room 1
AV Routing Screen - Room 1
Camera Screen
Recorder Screen - Room 1
Press the Home button, to return to the Home Screen

Press the Shutdown button, to shut everything down, including raising/lowering the projector screens.

- Room Mode Screen
- Email: Employee
Go to: Employee Email
- Email: SPAM (Barracuda)
Go to: Barracuda Login
- Equipment Checkout Request
- Faculty/Staff Request
As faculty and staff of MCC, you have the opportunity to checkout IT equipment to use for work related purposes.
Due to limited equipment availability, items may not be available when a request is submitted. Equipment will be distributed on a first-come, first serve basis.
To make a request, please complete the ISS Equipment Checkout Request (via Softdocs Etrieve).
- Recommend a Student
As part of the Institutional Resilience and Expanded Postsecondary Opportunity (IREPO) grant, MCC has IT equipment to checkout to students.
As faculty and staff of MCC, you may recommend a student, you believe, will benefit from access to IT equipment.
For details, questions, eligibility requirements, or to recommend a student, please see IREPO Grant (via MCC website).
- Faculty/Staff Request
- LinkedIn Learning
All staff and faculty have unlimited access to training offerings in LinkedIn Learning. You will use your MCC account credentials.
LinkedIn Learning Access
- Go to: LinkedIn Login
- Login with your MCC employee username and password
- Phone
- Printing
Printing for faculty/staff, is completed using Ricoh Printers and PaperCut Software. This is installed on all computers/laptops.
-
See the list of Ricoh printers, to print anywhere on campus (sorted A-Z):
List of Ricoh printers on campus by building and location. BUILDING
LOCATION
ADM 105 ADM 2nd Floor (Financial Aid) ADM 314 (MARCOM) ADM 409 BPAC 105 BT 112 BT 230 CSC 124 (copy room) CSC C-201 CSC D-Child Development Center CSC E-2nd Floor (Upward Bound/Adult Education Programs) CSC E-A 16 (Continuing Education) ESC 109 ESC Call Center (Enrollment Services) ESEC 106 FO 100 (LLC) Highlander Ranch 127 (VetTech) HP 115 HP 126 (Nursing) HP 210 LTC 100 (ISS) LTC Library Front Desk M 203 MAC 120 (University Center Workroom) MAC 224 MAC 324 MCCF Breakroom MTA 105 S 112 S 2nd Floor (workroom) S 345 SSC 2nd Floor (Student Development) SSC 319 (Student Engagement)
-
- Reports (Informer)
- SharePoint
- McLennan SharePoint Access
-
Go to: McLennan SharePoint Login
-
Login with your MCC employee username (first name initial and full last name i.e. jdoe) and password
-
- SharePoint How-To's
- Trade & Service Recommendations from MCC Community
-
Post items you are in search of (ISO) or wish to buy/sell in the MCC community Trade.
-
Find a list of local Service Recommendations: alterations, dentists, house painters and much more!
-
- Request SharePoint Access (via Help Desk Ticket)
- McLennan SharePoint Access
- Slate
Slate is a CRM (Customer Relationship Manager) currently used by the Admission and Recruitment offices to manage prospective students and applicants.
For additional information or questions about the CRM please contact Dustie Hamilton, Director of Enrollment Systems.
Request Slate Access/Account Information
- Submit the Slate User Access Request form
- Text Students (Mongoose)
Mongoose is a cloud-based solution for contacting students by text message.
Mongoose Access
- Go to: Mongoose Login
Need Account Setup/Initial Training?
- Contact Enrollment Systems: Dustie Hamilton, Director
- VPN (Virtual Private Network)
- Connect to VPN & Map Network Drives
- Install VPN
-
Click this URL: https://vpn.mclennan.edu/
-
Login with your username & password (i.e. jdoe)
-
Select the download option to meet the requirements for your computer (most users should select Window 64-bit)
-
Download and run the program to install VPN software
-
Select Next in the Setup Wizard window to begin setup
-
Select Next in the Select Installation Folder window
-
Select Next in the Confirm Installation window
-
Select Close in the Installation Complete window
-
Global Protect icon (picture of Globe) will display in the taskbar
-
- Login to VPN
-
Open GlobalProtect icon
-
In the address field, type: vpn.mclennan.edu & select Connect
-
Login with your username & password (i.e. jdoe)
-
- Request VPN (via Help Desk Ticket)
- Connect to VPN & Map Network Drives
- Wi-Fi Network: McLennan
McLennan Wi-Fi network is for Faculty & Staff ONLY - Guests & Students will be unable to access
How to Connect
- Username: First name initial & full last name (i.e. jdoe)
- Password: Email password
Students Only
- Email: Student
Student Email
Access
MCC Student email accounts are active up to 24-months after your last MCC class.
*After the 24-month period, the account, and all information in the account, will be purged/removed.
- Wi-Fi Network: MCC-Students
MCC-Students Wi-FI network is for Students ONLY - Guests, Faculty & Staff will be unable to access
How to Connect
- Username: First name initial, last name initial, & 7-digit MCC ID (i.e. jd1234567)
- Password: Email password
Former Students/Faculty/Staff, Guests & Non-Students
- Account & Password: Former Students/Faculty/Staff
- Forgot MCC ID
- Requires last name &
- Social Security number (SSN) or 7-digit MCC ID
- Forgot Password
- Requires user name & non-MCC email address
- Instructions will be sent to non-MCC email
- Forgot MCC ID
- Wi-Fi Network: MCC-Guests
MCC-Guests WiFi network is for non-MCC individuals ONLY - Faculty, Staff & Students will be unable to access
HOW TO CONNECT
- Select the MCC-Guest Network
- Select Join this Network
- Internet browser opens to a login page
- Under Sign-on, click on Create an Account
- Complete the info and enter a valid email address
- Click Register to receive Account Created notification page
- Check email for username and password (may take 3-5 minutes to receive)
- Go back to connect, enter info and sign-on
- Click Accept on Acceptable Use Policy page
- Click Continue to connect to the network
- Access valid for 24 hours
Last updated: 5/16/24
Contact Hours
Questions?